Step element list

How do I create a step element list?
1.Create folder

Create a folder or select an existing folder. The step elements are created in this folder.
2.Create step element in folder

- Select list view
- Create a new data record using the + symbol. Select the UKS content element "Step element" , which is located in the selection below.
- First add a heading to this data record. You have the option of selecting a different heading for the backend (tip: numbering here). You can now select whether further text should be added below the heading, a link or further text.
- You can format extensively in the text editor, e.g. for a listing you can choose between a numbered list or checkboxes. These checkboxes are not active on the page, but may be suitable for a printout.
- You can add an image or a video. To do this, select existing media from a directory or upload a new medium via the directory.
- If you want to emphasize a text, use the option to place it on a blue background. Further links can also be created here.
- Save the step element.
- Further step elements can then be created.
The step elements are only edited in the list view.
3.Create list

- Select the page where the list is to be placed.
- In the page view, either click on Create new content element (+Content symbol)
or click on the + symbol in the bar above the page and click on Step element list, then drag and drop the new content element onto one of the areas marked in green. - Give the new list a heading and save it. I have the option of setting a link and inserting a text at the end of the step list.
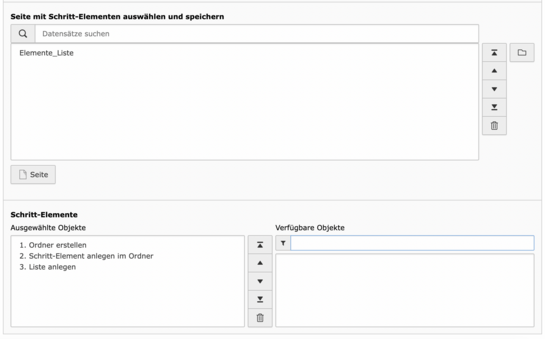
Select the folder with the list elements using the drop-down menu with the heading"Select and save page with step elements".
The available objects then appear in the context area and can be selected by clicking on them, sorted using the arrows and deleted if necessary.
Then save again and you can view the new list in the browser via "Show website" (module bar above the page).
Changes in the step elements can only be made in the list view in the folder. For an updated view in the frontend: Ctrl+F5 - the changes made in the step elements are visible.
If the changes are not automatically displayed in the frontend, delete the selected element in the list and add the updated available object to the list again. Then save and display in the browser.

